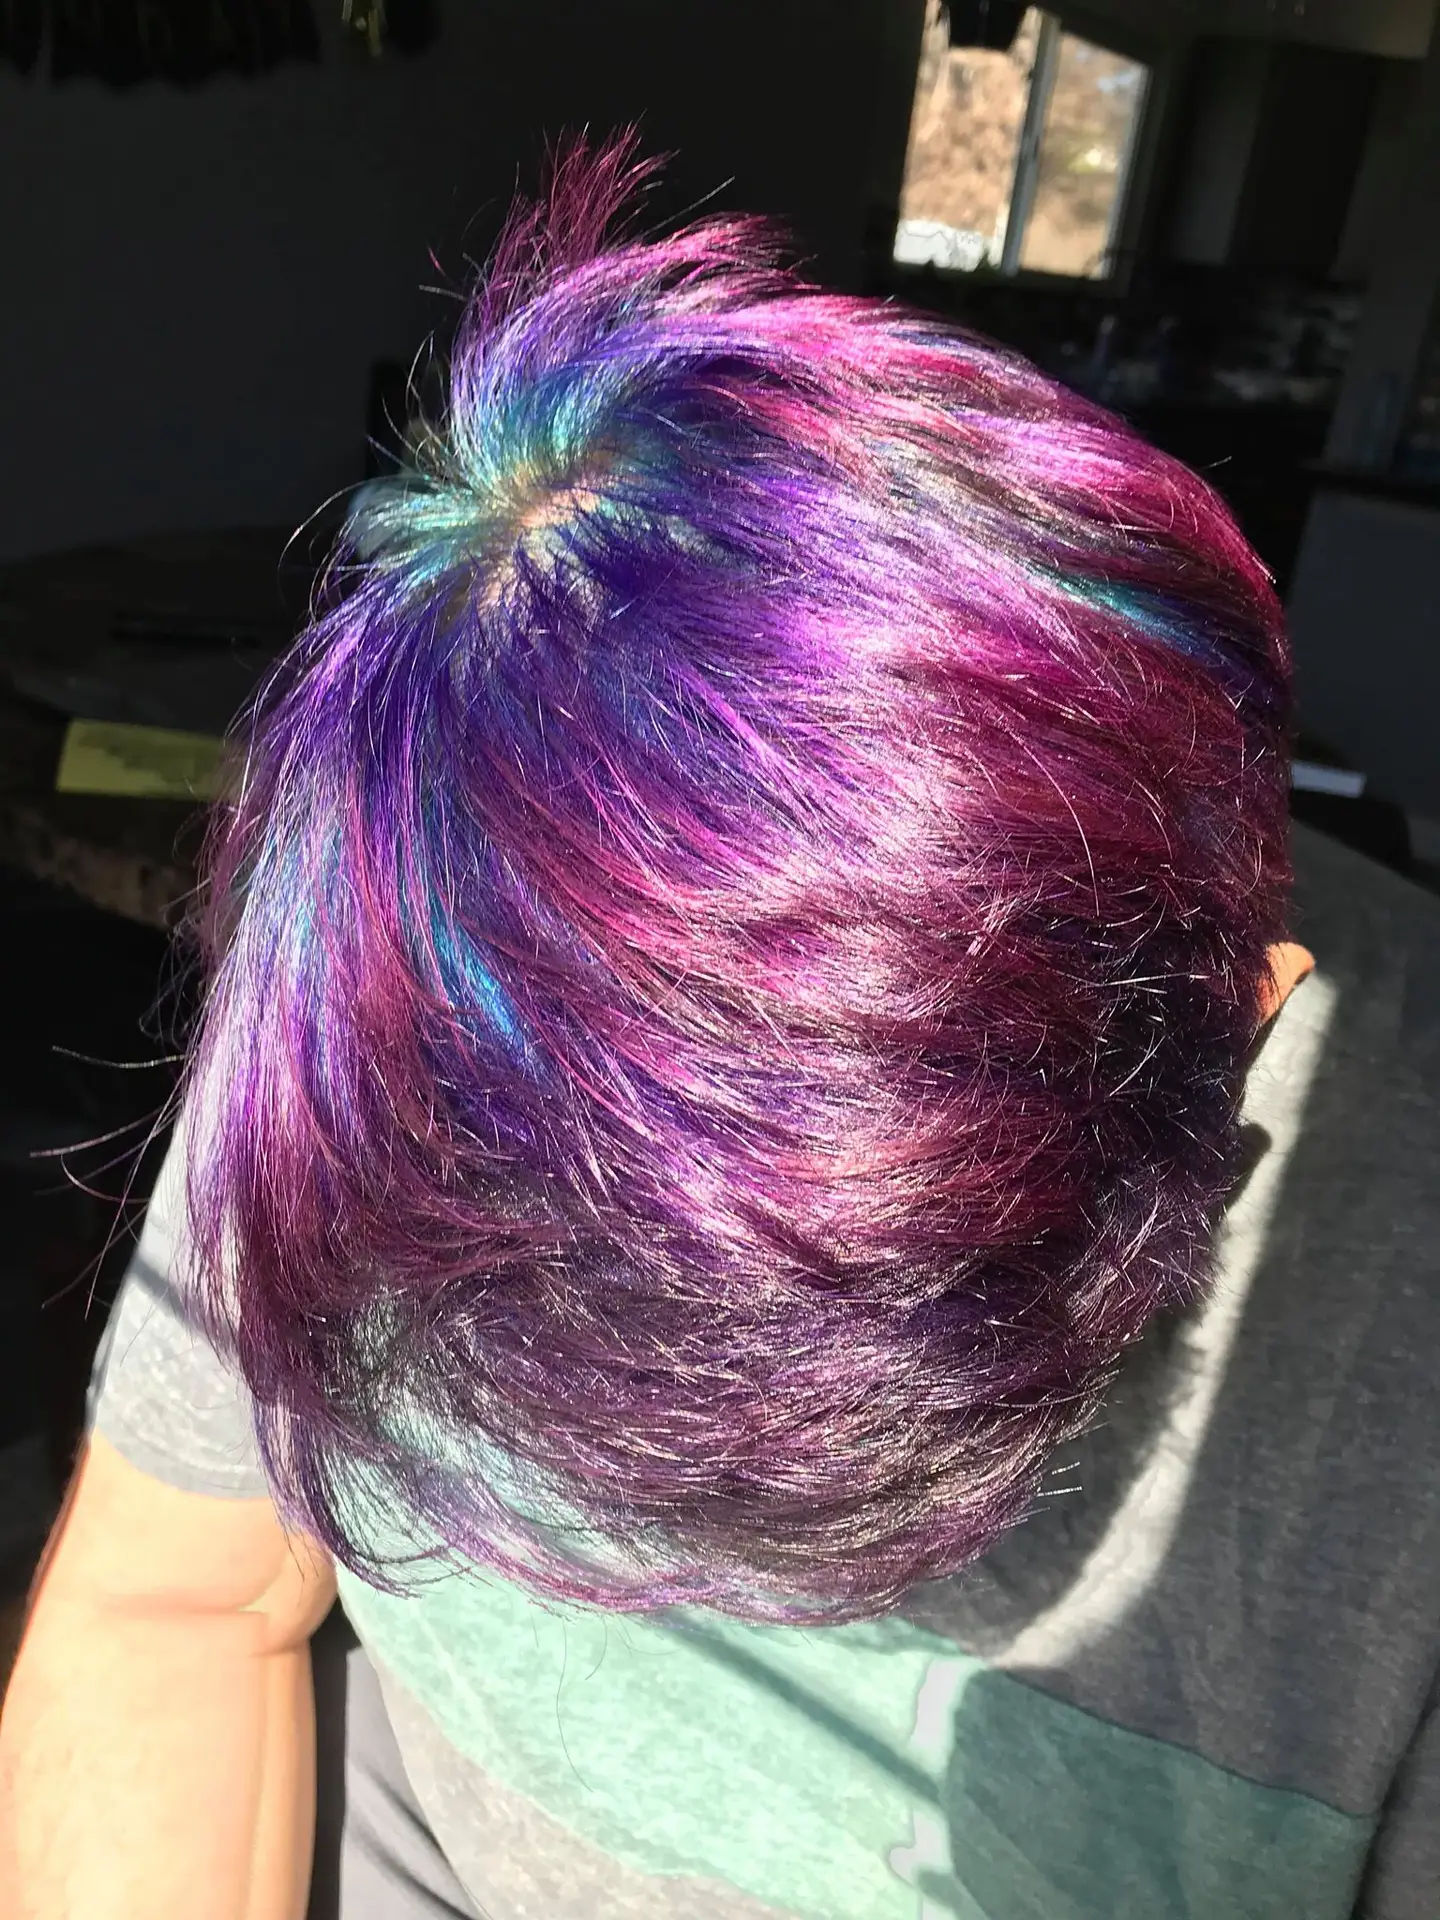
How to Give Yourself Magical Unicorn Hair

Changing up your hair can intimidating at first, but it’s also really fun – especially when you do unicorn hair! It’s a chance to really play with your self-expression. If you mess up, you can always dye over it or get a hair cut.
I want to preface the rest of this post by saying that I am NOT a professional, licensed cosmetologist. This is written from my personal DIY experiences. Unless you are comfortable with DIY-ing at your own risk, it would be good to consult a professional before attempting this unicorn hair tutorial.
I’ve been feeling the itch to dye my hair for a while. I used to dye it myself all the time in high school and college. As my hair got longer, I stopped because it was a lot of work and maintenance. Also, when entering the “professional” world, I felt I had to tone down these aspects of myself.


Now that I’m older, I realize I don’t want to work somewhere that doesn’t accept me for who I am. I’m fortunate to work somewhere where I’m encouraged to bring my whole self to work.
That encouragement coupled with everything else going on in life (pandemic, social unrest, uncertainty about the future) is what finally pushed me to dye my hair. I needed a creative outlet and to “feel like myself” again.
Okay, now on to the actual tutorial part of this post!
Supplies:
- Plastic mixing bowls
- Hair coloring brushes
- Hair clips or hair ties (to section your hair)
- Foil (if you want to separate the hair that will be lightened from the rest of your hair)
- Hair bleach – I use L’Oreal Quick Blue High Performance Lightener (if your hair is dark, you’ll need to lighten it if you want vibrant colors. If your hair is light, you can probably skip the bleach)
- Creme Developer – I use Salon Care 30 Volume. These come in volume 10, 20, 30, and 40. In my experience, the 40 is too strong and can easily dry and damage your hair. I would recommend starting with a lower volume developer. You should wait at least a couple of weeks before bleaching your hair again if you haven’t achieved the desired lightness.
- Purple Shampoo – I use L’Oreal Paris EverPure. Purple shampoo removes the brassy/orange tones from blonde hair.
- Hair dye – I’ve used Manic Panic, Special Effects, and for this recent dye job, Pravana ChromaSilk Vivids and Lime Crime. It’s too soon for me to gauge which one is the longest lasting out of all these. I will say that reds seem to fade the fastest, regardless of the brand.
Shout out to my husband for allowing me to experiment on him and using him as a model!
Instructions:
- You’ll want to make sure you’re wearing old clothes you don’t mind getting stained. It’s also a good idea to set down old towels and/or newspapers on the ground and/or the sink. You’ll also want to put some vaseline around your hairline, ears, and nape of your neck to prevent these areas from getting stained.
- Section out your hair using hair ties or clips.
- Follow the instructions for mixing the bleach and developer. Generally, you mix these together in the mixing bowl.
- Start applying bleach to the hair sections.


- Leave the bleach in for the directed time. You’ll want to make sure you don’t go over the recommended time as you don’t want to damage your hair.
- Wash out the bleach from the hair and use the purple shampoo. Don’t use conditioner.
- Dry the hair completely.
- Start applying the hair dye. It helps to still do this in sections to ensure you’re saturating all the hair strands.
- Rinse with cold water until the water is mostly clear. All the hair dye boxes/bottles will say to rinse until the water runs clear, but in my experience, this almost never happens.
If you’re planning on doing any color blending/melting (where you use different colors to create a kind of gradient effect), you’ll want to use the color wheel theory when considering the order of colors. Generally, you’ll want to use colors that are next to each other on the color wheel instead of across from each other.
When doing mine and my husband’s hair, I used blue at the base, purple/violet in the middle, and magenta at the ends.


Post-Color Hair Tips:
- You’ll want to wait a few days before washing your hair. Invest in a sulfate-free shampoo for color-treated hair and only shampoo your hair once or twice a week. Your hair color will fade with each wash. Shampooing your hair also strips the natural oils that you need to moisturize your hair.
- For the first few days, you’ll probably want to cover your pillow with a towel as it’s possible your hair will still have some pigment in it.
- Bleaching can dry and damage your hair, so you’ll want to make sure you’re bringing some of that moisture back in. If your hair is really dry, you’ll want to deep condition it at least once a week. This will also depend on your lifestyle – if you swim, use heat tools, or spend a lot of time outside, you’ll want to deep condition your hair somewhat regularly. Let your hair be your guide.
- Speaking of swimming, I recommend putting your hair up or using a swim cap when swimming. Chlorine can also strip your hair color.
- Shower with cold or lukewarm water. Hot water will contribute to your hair color fading, whereas cold water will help lock in your color.
- Touch up your color as needed. I usually let my hair colors fade a bit before doing a touch up, sometimes the faded colors look really nice!

